The Urban Bazaar at the Open East Festival

Handmade goods from the Urban BazaarToday I went to the Open East festival in the Olympics park. I had a really fun day watching the athletics in the stadium before heading down to the Urban Bazaar and taking a few snaps. I thought I'd share some of these handmade beauties that were available to purchase.

Handmade goods from the Urban Bazaar
I love looking around at other peoples creations and being inspired and supporting their work. I hope you enjoy my pictures too. Zoe x

Cassie's Crocheted Camera Case

Moss Stitch Crocheted Camera Case
I have mentioned to you before that my sister Cassie is a fellow crafter and today I am handing over to her so she can tell you about her latest project:

I recently crocheted myself a cover for our iPad. I'm not sure how much protection it actually offers but it looks jolly pretty. My mum seemed to think it was really funny, that something so high tech would be placed in a crocheted case. Turned out she liked it really though as last week she text me the dimensions of her new point and shoot camera asking if I would make a case for that.

Moss Stitch Crocheted Camera Case
Being much smaller than an iPad I knew it was a quick project for one evening and I decided I'd have a go at a stitch I haven't done before. It's called Moss stitch and it's super simple for anyone who has ever crocheted. You can find instructions here. I had chosen 3 colours and as I hate having to sew in lots of ends I decided to just work with the three yarns attached. I had to untwist things a couple of times! You can use as many colours as you like and fasten off at the end of each row if you choose. I added a popper to close and a button for decoration.

Moss Stitch Crocheted Camera Case
I really like the effect of the moss stitch and hope my mum does too but most importantly, I hope it fits the camera!! Cassie. xoxo

Thanks Cassie for sharing this cute case with us, and obviously it was a perfect fit for the camera. We hope to hear some more from you and your crafting soon. Zoe xx

Union Flag Quilt

Union Flag Quilt Hanging
In celebration of some more british sporting success over the weekend I thought I'd share this quilt that I made about three years ago with you. The Union Flag Quilt is the first quilt I ever designed. In fact it is the first quilt I ever made! I have broken down the steps of how I put together the quilt top. First you need to gather your fabric, you need several different fabrics in each of the three colours: red, white and blue. These can be patterned fabric, in fact its better if they are, just be obviously mainly the right colour. A good way to buy this is in fat quarters so you have a range of fabrics in each colour section, but I have also used a few scraps I had left over in the right colours. Using a rotary cutter and quilters ruler cut 146 white triangles, 208 red triangles and 128 blue triangles. I cut 20cm squares from my fabric and then cut these into 8 triangles as you can see on the left.
Union Flag Quilt piecing
I then stitched together the triangles to form the right number of squares and pressed the seems to one side. The total number at the bottom is how many to sew of each colour way, the first number in the sum is how many of each colour way you need for a quarter of the quilt.
Once I had all my squares I stitched these together into rows,
Union Flag Quilt Blocking
and then I pressed the seems to one side and then stitched together these rows and pressed the seems to one side. This completed a quarter of the quilt and finally I stitched together the quarters. Then I quilted and bound it, but ill talk more about these parts of quiltmaking another time. 

I have used this quilt for everything; we snuggle under it in winter; use it as a picnic blanket in summer; and of course to support GB in the Olympics (as in the photo above), Wimbledon, the Tour De France, the Jubilee and the royal baby, so it's had quite alot of use recently. Zoe xx

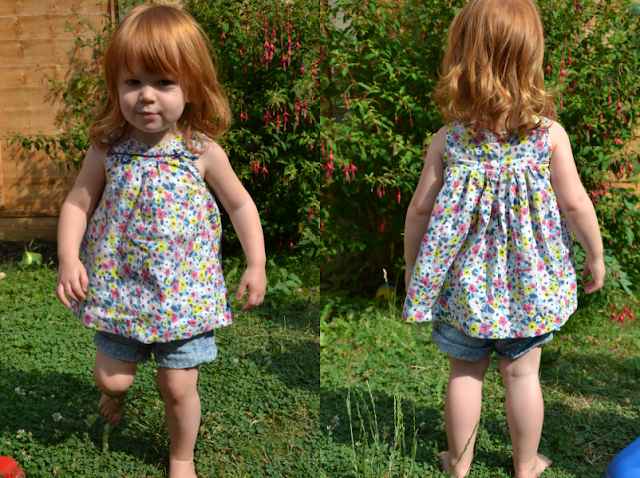
Upcycle: From a Dress to a Top

Dress and Top Fronts
This dress is one of my absolute favourites from my daughters wardrobe so when it started getting too small I was really reluctant to pass it on. I also really wanted to be able to use the fabric for another project that I am working on. I came up with a brilliant solution and I have changed it from a dress to a top and managed to cut out a 30cm square of fabric to use. I unpicked the top of the dress on the front and took out some of the multitudes of pleats, it would have been too full to work on a top any way, then I cut out the middle section of fabric, added one pleat back in and then restitched the seam I had unpicked.

Dress and Top Backs
I left all the pleats in the back, partly because it would have been much more complicated to alter this side with the button down but also because I wanted it to be a nice floaty breezy top for summer still. All I had left to do was stitch up the hem to make it the right length for a top. Then Voila:

Finished Top On

I am chuffed I have managed to keep this as an item of clothing. I think it will look adorable over some jeggings when it starts to get a little cooler too. Two of my most favourite instagrams were of my daughter in this dress (here and here) and now I get to take even more photos of her in it. Woop Woop. Zoe x

White Chocolate Chip Ice-Cream (No Ice-Cream Maker Needed)

White chocolate chip icecream in a bowl with strawberries
This has to be the easiest and sweetest ice-cream recipe ever. I don't own an ice-cream maker so when I stumbled upon (aka found via pinterest) this recipe I had to try it. The recipe only uses three ingredients to make vanilla icecream but I thought it would be more fun to add in some white chocolate chips, so I also used 200g chopped white chocolate.

Ingredients for white chocolate chip icecream


If I am honest this is a little on the sweet side for me so I would probably use dark chocolate instead of white to balance it out a bit next time. That said the Husband and Kiddos loved it.

Homemade white chocolate chip icecream
Now I just need to figure out how to make other flavours with this as the basic recipe and then I will never need an ice-cream maker. Zoe xx

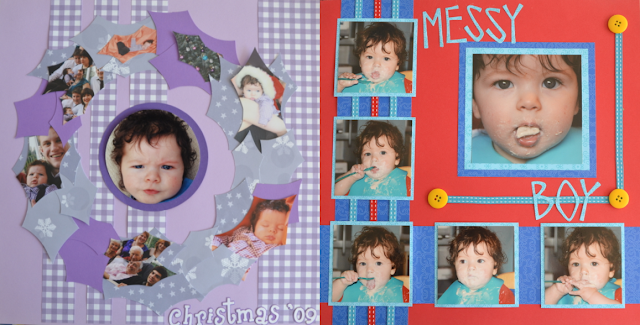
Scrapbooking

Autumn and Winter Scrapbook pages

Recently a friend said to me, 'there is no point in printing photos any more, it's just as good to look at them on the computer.' I could not disagree more. I love having printed photos and I spend time looking through them on the computer to choose the best ones but I am still excited to look at them when they come in the post. I still love being able to cut them up to different sizes and put them together in albums and scrapbooks. And I still would choose to look through the photos in an album or scrapbook than on the computer any day of the week. I am by no means an expert at this so I stick to fairly traditional scrap-booking ideas but I have a few photos of some of my favourite pages for you here.

Newborn Scrapbook Pages

I am making three scrapbooks at the moment, one for each of my children. They're all still pretty young but I intend to make them as a summary of their first 18 years or so and give them as gifts for their 18th birthdays. My Mum gave a scrapbook to me when I turned 18 and it is lovely to have photos of myself when I was growing up in my own home to reminisce over and show to my children. Without the scrapboom I wouldn't have any record of it. (Now this is where my friend may have had a point, because there will be a record of my children's photos on their computers and probably on Facebook but its just not the same. Their children will need something tangible too.) I only include special photos in the scrapbooks. Either of special occasions, like being born or first Christmas, or of particularly cute photos of them.

First Christmas and Messy Boy Scrapbook Pages


I keep photos for myself in photo albums and I don't add any embellishments to them at all. I simply don't have time to make every photo I love into a scrapbook, and even if I did, then the scrapbooks wouldn't be nearly so special. If you haven't printed any photos recently, you definitely should. I think I might go and look through all my albums now! Zoe xx


Vintage Sheets Quilt Planning

Recently I have been collecting vintage fabric. The trouble is, so is every one else. I am hoping to make a quilt from my collection but I just can't decide what it should look like. Quilting is my first love when it comes to sewing and I will over time share lots of new and old projects with you. But I just can't make up my mind about this one. The other quilts I have made were for other people but I want to make this one just for me (well and the husband).


Another problem I have: I don't know when to stop collecting, I get so far and then I think, I need just a bit more of this colour, or of that pattern. I think I nearly have the right collection for a quilt, and obviously I will have some leftover to make things like this crochet hook case I made for my sister. I have been pinning ideas  on my quilts board. I am tempted by one like this. What do you think? Have you seen any ideas that you think would work? Leave a link in the comments if you have any ideas because I would love to see them. In the mean time I think I need some more green... ;) Zoe xx

Marshmallow Glitzies

This is something I used to make as a child so I have no idea where the recipe comes from but I remembered it. It's very easy. I mean very very easy. 

This is what I used:
4oz marshmallows
4oz dairy toffee
4oz butter
7oz of rice crispies
1/2 tsp edible glitter (optional)
This is what I did:
Put marshmallows, toffee and butter into a pan and gently melt over a low heat stirring occasionally. When the ingredients all come together pour in all the crispies and 1/4 tsp of glitter and stir.
When it is thoroughly mixed, press into a 20x20cm tray. Sprinkle the remaining glitter over the top and cut into 16ish pieces. Refrigerate for an hour or so.
Then eat. Yum yum. Zoe x


Sharpie Flower Pot


 The Sharpie mug. They've been all over Pinterest and the crafting blogosphere for some time. So I had a thought, what about a Sharpie flower pot? I had this plain white flower pot:
I decided to give it a make over. I drew triangles with my Sharpie all over it:


Then I popped it in the oven at the hottest temp it would go and cooked for 30 minutes. I turned the oven off and left it in until it cooled.
That's it. This is great because some people have been complaining about the pen coming off in the dishwasher but I don't put my flower pots in the dishwasher all that often so it'll stay on. Yey! Zoe xx

Homemade Lemonade


The first time I had homemade lemonade I was in America on the 4th of July. I was at a barbecue and I remember drinking it and thinking, 'I have to learn to make this.' This is how I make it, but I like it REALLY lemony, so you might want to add more sugar than me.
 I use the juice from 4 lemons, 125g caster sugar, 1l fizzy water (or still if you prefer) and ice. The method is so simple. I heat the juice and the sugar in a saucepan until all the sugar dissolves. Then I take it off the heat and, once cooled, pour in the water. I used slightly less than 1l of water for this batch but add as much as you think tastes right.


It  is so refreshing to have this on a hot day so its perfect for this week. Long may the sun shine so we can drink more of this tasty stuff. Enjoy it! Zoe xx

P.S Comments are now working properly, so if you'd like to add a comment to any post, go ahead!

English Paper Piecing

English paper piecing is a traditional technique used in patchworking, it is often used with hexagons or other isometric patterns (ones with 60 degree angles instead of 90 degrees). I am slowly working my way through a small hexie quilt for my daughter. I'd really like it to be finished before the winter so she can have an extra layer in bed when it gets colder. I thought I would share the very simple method although I am certain you can find many other tutorials for this around.

All you need is paper, fabric scraps, paper hexagons, a pin, scissors and needle and thread. The fabric needs to be cut into hexagons slightly larger than the paper. You pin a paper hexagon to the back of a fabric hexagon and then tack them together with a running stitch. Once you have two hexagons, you stitch along one edge while they're right sides together. Then you add more in using the same method. Once you've sewn enough together, you press them and cut out the paper. I haven't reached this stage yet, as you can see all my paper hexagons are still sewn in.

I have randomly chosen hexagons here but herehere and here are other examples of how you can arrange shapes and fabrics with this method. I'm looking forward to showing you the finished article. (Although this took me quite a while so I wouldn't bank on it being finished by winter.) Zoe xx
Related Posts Plugin for WordPress, Blogger...